Thursday 19 January 2017

How to Fix a Nutanix CVM being Stuck in Maintenance Mode

1. ssh into the Nutanix cluster VM
2. cluster status
3. ncli host list (This will give you the host ID)
################
   Id                        : 9911991c-1111-093y-11yb-blahblah88::61810    
   Uuid                      : 5blahblabla99-5227-43d9-ae05-24
   Name                      : NTNX-SERIAL-X
   IPMI Address              : 10.10.3.3
   Controller VM Address     : 10.10.2.2
   Hypervisor Address        : 10.10.1.1
   Host Status               : NORMAL
   Oplog Disk Size           : 428.02 GiB (459,587,190,986 bytes) (0.7%)
   Under Maintenance Mode    : false (Hypervisor upgrade)
   Metadata store status     : Metadata store enabled on the node
   Node Position             : Node physical position can't be displayed for this model. Please refer to Prism UI for this information.    
   Node Serial (UUID)        : VENDORSERIAL    
   Block Serial (Model)      : VENDORSERIAL (NODE MODEL)###############

4. ncli host edit id=9911991c-1111-093y-11yb-blahblah88::61810::61810 enable-maintenance-mode="false"

5. cluster status

Wednesday 18 January 2017

Moving a vCenter server into a EVC cluster.

It’s a catch 22 scenario, you want to run your vCenter server in a cluster with EVC enabled, but you can’t build/manage a cluster without vCenter running so here is how you do it.
1) Build vCenter  on ESX server 1
2) Build a cluster in vCenter, enable EVC and place ESX Server 2 in that cluster.
3) Power down vCenter Server(s),. open vSphere client, connect to ESX server 1, remove the vCenter VM(s) from inventory (DO NOT delete from disk). close vSphere client
4) Open vSphere client, connect directly to ESX server 2.  Browse the datastore for the vCenter VM(s).  Connect to them, power them up.
5) You can now connect to the vCenter and move ESX server 1 into the EVC cluster.

Wednesday 8 July 2015

SCCM 2012 - Error 0x800706BA Failed to install Distribution Point

Few months back when I was deploying the distribution point role on a windows server 2012 R2 server I came across this error Error 0x800706BA Failed to install Distribution Point when I checked the distmgr.log file. If you can see the below screenshot, you will see the line DPConnection::ConnectWMI() – Failed to connect to servernameThis means that SCCM server is unable to connect to the WMI namespace on the target machine which is why the installation of distribution point is failing. You would also see an error which reads Failed to install DP files on the remote DP Error code=1722. Now let’s see how to fix this issue.
Error 0x800706BA Failed to install Distribution Point Snap1
Here is the way to fix this error. What you need to do is parse a MOF file on the target server on which you are installing the Distribution Point role. You need to look for smsdpprov.mof file which is found  in<drive:>\Program Files\Microsoft Configuration Manager\bin\X64 in your primary site server. Copy it to any drive or in a folder on the target DP server. Run the command prompt as administrator and execute the following command.
mofcomp.exe smsdpprov.mof
Note – MOF is a file extension for a Windows Management Object file format. MOF files created in the Managed Object Format have syntax based on Microsoft Visual C++.  MOF files can be compiled into the Windows Management Instrumentation (WMI) repository using mofcomp.exe.
In the below screenshot you can see that after running this command you see that MOF file has been successfully parsed.  This will create the WMI name space and after this step you should be able to install the DP without any issues. Don’t be afraid if it initially fails in the Distribution Point Configuration section in monitoring, just be patient and give it some time.
Error 0x800706BA Failed to install Distribution Point
http://prajwaldesai.com/error-0x800706ba-failed-to-install-distribution-point/

Wednesday 17 December 2014

VMXNET3 vs E1000E and E1000 – part 2

Network performance with VMware paravirtualized VMXNET3 compared to the emulated E1000E and E1000.
In the first article the general difference between the adapter types was explained.
In this article we will test the network throughput in the two most common Windows operating systems today:Windows 2008 R2 and Windows 2012 R2, and see the performance of the VMXNET3 vs the E1000 and theE1000E.
vmxnet3-iperf-1
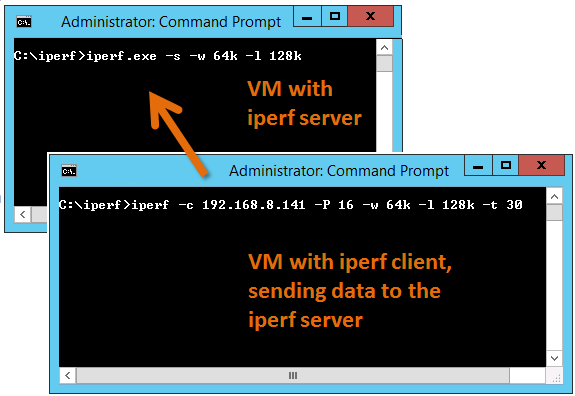
To generate large amounts of network traffic I used the iperf tool running on two virtual machines, one iperf “client” and the other as “server”. I have found that the following iperf settings generates the best combination for network throughput tests on Windows Server:
Server: iperf -s -w 64k -l 128k
Client: iperf -c <SERVER-IP> -P 16 -w 64k -l 128k -t 30
The test was done on HP Proliant Bl460c Gen8 with the virtual machines were running on the same physical host to be able to see the network performance regardless of the physical network connection between physical hosts/blades.
All settings on the E1000, E1000E and VMXNET3 was default. More on possible tweakings of the VMXNET3 card settings will be explained in a later article.
(It shall of course be noted that the following results are just observations from tests on one specific hardware and ESXi configuration, and is not in any way a “scientific” study.)

Test 1: Windows 2008 R2 with the default E1000 adapter

vmxnet-10
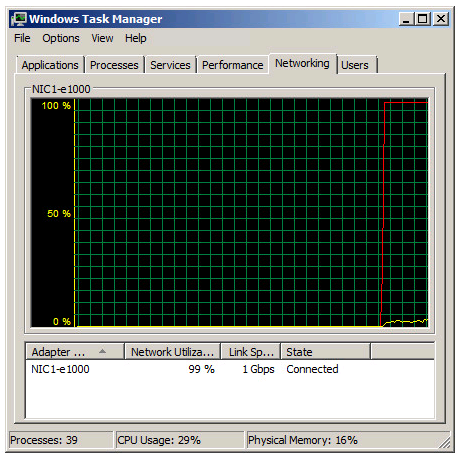
Two Windows 2008 R2 virtual machines, one as iperf server and the other as client, with the test running in 30 seconds.
As noted in the Task Manager view the 1 Gbit link speed was maxed out. A somewhat interesting fact is that even with the emulated E1000 adapter it is possible to use more than what “should” be possible on a 1 Gbit link.
e1000
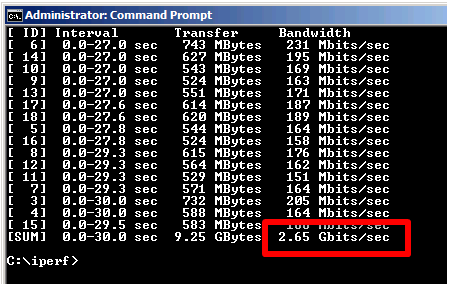
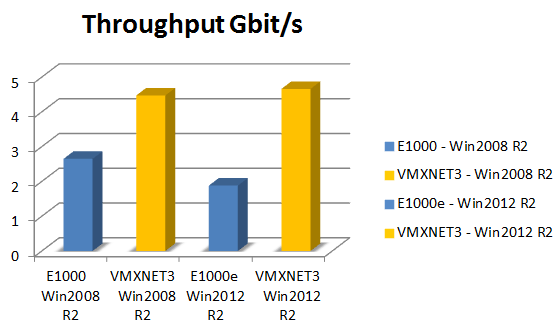
From the iperf client output we can see that we reach a total throughput of 2.65 Gbit per second with the default E1000 virtual adapter.

Test 2: Windows 2008 R2 with the VMXNET3 adapter

vmxnet-12
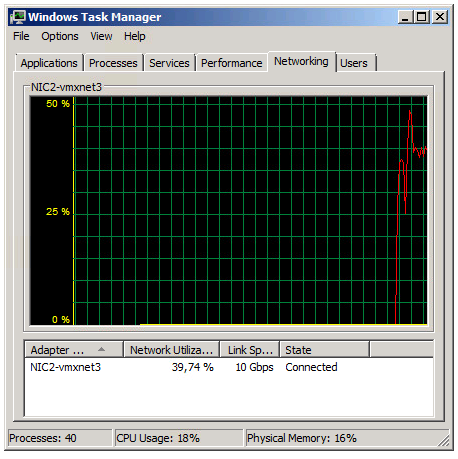
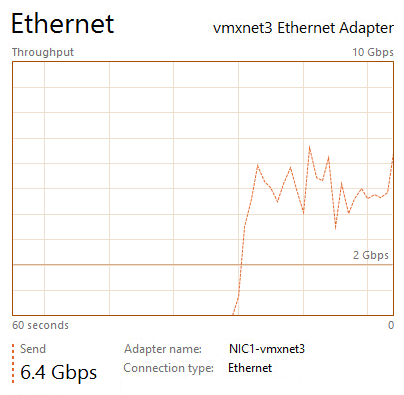
The Task Manager view reports utilization around 39% of the 10 Gbit link in the Iperf client VM.
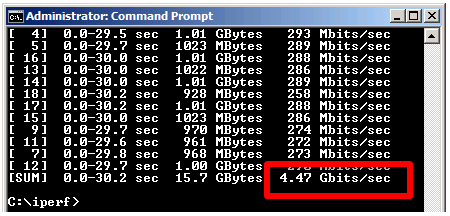
vmxnet3-2008r2-iperf
The iperf output shows a total throughput for VMXNET3 of 4.47 Gbit / second over the time the test was conducted.
The VMXNET3 adapter demonstrates almost 70 % better network throughput than the E1000 card on Windows 2008 R2.

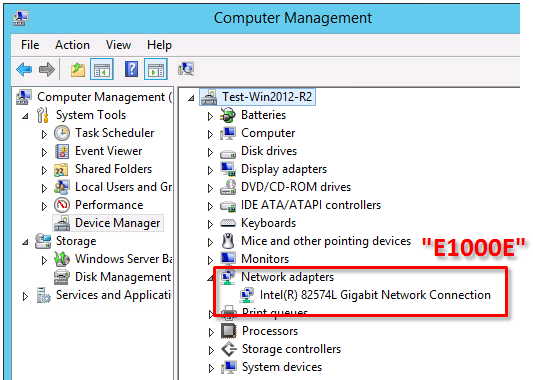
Test 3: Windows 2012 R2 with the E1000E adapter

e1000e-3
The E1000E is a newer, and more “enhanced” version of the E1000. To the guest operating system it looks like the physical adapter Intel 82547 network interface card.
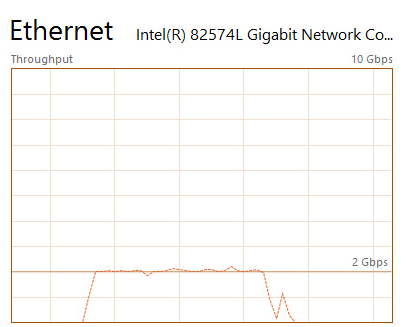
However, even if it is a newer adapter it did actually deliver lower throughput than the E1000 adapter.
e1000e-2
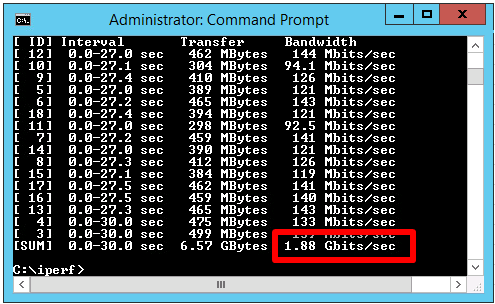
Two virtual machines running Windows 2012 R2 with the iperf tool running as client and server.
e1000e-nic
E1000E got 1.88 Gbit / sec, which is considerable lower than the 2.65 Gbit/s for the original E1000 on Windows 2008 R2.

Test 4: Windows 2012 R2 with the VMXNET3 adapter

vmxnet-2
The two Windows 2012 R2 virtual machines now running with VMXNET3 adapter got the following iperf results:
vmxnet-1a
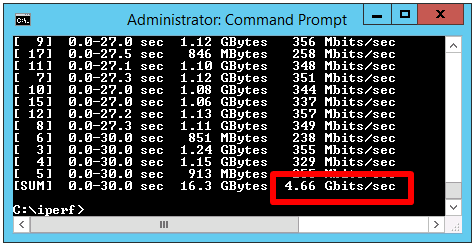
The throughput was 4.66 Gbit/sec, which is very close to the result of VMXNET3 on Windows 2008 R2, but almost 150 % better than the new E1000E.
vmxnet3-vs-e1000
In summary the VMXNET3 adapter delivers greatly more network throughput performance than both E1000 and E1000E. Also, in at least this test setup the newer E1000E performed actually lower than the older E1000.
The test was done on Windows Server virtual machines and the top throughput of around 4.6 Gbit/sec for the VMXNET3 adapter could be the result of limitations in the TCP implementations. Other operating systems with other TCP stacks might achieve even higher numbers. It shall be noted also that these test was just for the network throughput, but there are of course other factors as well, which might be further discussed in later articles.
This entry was posted in NetworkingVmware and tagged . Bookmark the permalink.

Wednesday 12 September 2012

Customizing Citrix Web Interface 5.4


If like me, you like to remove the majority of the Citrix Branding from the web interface, you may find this post useful. Below I’ve broken the web interface down into the 6-7 components that are modifiable and given instruction on how to remove, or replace the images / tag lines.
This blog post would not have been possible without the hard work by the guys on the Citrix forums: http://forums.citrix.com/thread.jspa?threadID=278277&tstart=0
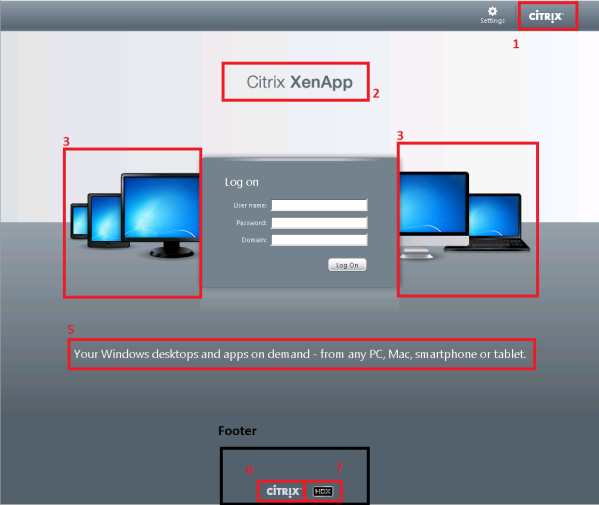
Below you will find a break down of the seperate web interface components, and the numbers I’ve allocated to them, I’ve used the login screen as a template, as this contains all the images / taglines you will see on the web interfaces different screens.
Note: The image names containing “Dark” or “logged off” are specifically for the logged off screen. You’ll find both gif (for older browsers ) and png files for each of the different images.
1: Header logo.
To remove the logo from the top of the page, find the below entry in.\app_data\include\fullstyle.inc and add the bolded text:
#headerLogo {
padding: 11px 0 11px 18px;
display: none;}
To use a custom graphic instead of the default, modify the following files:
.\media\CitrixLogoHeader.png
.\media\CitrixLogoHeader.gif
(there’s no dark logo for this file)
2: Product graphic.
This product graphic can be either XenApp or XenDesktop depending on your installation. To remove the product graphic, find the below entry in .\app_data\include\fullstyle.inc and add the bolded text:
#horizonTop img {
padding-top: 75px;
Display: none;
}
To use a custom image in place of the product graphic, modify the following files:
For XenApp:
.\media\CitrixXenApp.gif
.\media\CitrixXenAppLoggedoff.gif
.\media\CitrixXenApp.png
.\media\CitrixXenAppLoggedoff.png
For XenDesktop:
.\media\CitrixXenDesktop.gif
.\media\CitrixXenDesktopLoggedoff.gif
.\media\CitrixXenDesktop.png
.\media\CitrixXenDesktopLoggedoff.png
3: Devices.
The devices image appears to the left and right of the login window. To remove the Devices graphic, find the below entry in .\app_data\include\fullstyle.inc and add the bolded text:
.horizonPage .mainPane {
position: relative;
top: -120px;
background: none;
color: white;
padding: 0;
overflow: auto;
}
To replace the devices image with a custom image, modify the following files:
.\media\Devices.gif
.\media\DevicesLoggedoff.gif
.\media\Devices.png
.\media\DevicesLoggedoff.png
5: Tagline.
To remove the tagline “your windows desktop and apps on demand – from any pc”, find the below entry in .\app_data\include\fullstyle.inc and add the bolded text:
#horizonTagline {
color: #F2F2F2;
font-size: 180%;
font-weight: normal;
margin: 50px 0 0 0;
padding-bottom: 10px;
text-align: center;
display: none;
}
To enter a custom tagline, find the below entry in C:\Program Files (x86)\Citrix\Web Interface\5.4.0\languages\accessplatform_strings.properties and replace the bolded text with your custom message.
HorizonTagline=Your Windows desktops and apps on demand – from any PC, Mac, smartphone or tablet.
Footer:
The footer on the web interface site is made up of potentially two components, the Citrix footer logo and the hdx logo. If you wish to indiscriminately remove both from the login page, find the below entry in .\app_data\include\fullstyle.inc and add the bolded text:
#footer
{
text-align: center;
padding-bottom: 10px;
display: none;
}
#footer p
{
padding: 10px 0;
display: none;
}
6: Citrix Logo
The Citrix footer logo appears at the bottom of most web interface pages. To remove the logo, find the below entry in .\app_data\include\fullstyle.inc and add the bolded text:
#footer img
{
padding: 0 8px;
vertical-align: middle;
display: none;
}
To replace the footer citrix logo with a custom graphic, modify the following files:
.\media\CitrixWatermark.png
.\media\CitrixLogoDarkLoggedOff.png
.\media\CitrixWatermark.gif
.\media\CitrixLogoDarkLoggedOff.gif
7: HDX logo
The HDX footer appears at the bottom of the login page. To remove the logo, find the below entry in .\app_data\include\fullstyle.inc and add the bolded text:
.horizonPage #hdxLogo {
display: none;
}
To replace the HDX logo with a custom graphic, modify the following files:
 .\media\HDX.gif
.\media\HDXLoggedoff.gif
.\media\HDX.png
.\media\HDXLoggedoff.png
And that’s it! hopefully with the above info you can remove the unsightly self advertisement and replace it with something unique to your organisation.


Credit to Andrew Morgan:

Citrix XenApp 6.5 server missing the “Citrix XML Service” in the Services Console


Problem
You log onto your XenApp server and notice that the services console does not list Citrix XML Service as a service (this service is usually listed under Citrix XenApp Commands Remoting):
clip_image002[16]
Navigating to the following registry key also doesn’t show any configuration settings:
HKEY_LOCAL_MACHINE\SYSTEM\CurrentControlSet\services\CtxHttp
image
Solution
While there could be various reasons that could cause this, one of them would be because you have chosen to install the IIS XML integration during the install.  In the event that you want to change the port, you’ll need to use the ctxxmlss.exe /r<port #> command as shown in the following:
ctxxmlss.exe /r8080
clip_image002[6]
Notice how the Citrix XML Service is now listed as a service:
clip_image002[8]
The configuration settings will also be populated in the registry:
clip_image002[10]
Note that the service isn’t automatically started when you register the XML service with the port so make sure you start the service:
clip_image002[12]
You can also test by telnet-ing to the port on the server to see if you get a response:
image
image
Hitting the enter button will also terminate the session and display the following response:
clip_image002[14]
credit to Terence Luk:
http://terenceluk.blogspot.ca/2012/07/citrix-xenapp-65-server-missing-citrix.html